728x90
앞선 포스팅
- Vite React TypeScript 개발환경 설정하기
https://devchaeyoung.tistory.com/72
Vite React chatApp 만들기 ToDos ✏️
Vite React TypeScript 설정하기App.tsx 파일 vite 서버로 실행하기- 프로젝트에 맞는 CSS 설정하기
- socket.io를 이용한 채팅 만들기
완료된 프로젝트 보일러플레이트 보러가기 >> https://github.com/devchaeyoung/vite-chat-app
01. 사용하려는 css라이브러리 선택하기
js in css : styled-components
간단한 프로젝트여서 빠른 스타일링을 위해 상대적으로 손에 익은 js in css인 styled-components를 선택했습니다.
- 사이트 참고@emotion.sh/docs/install
yarn add @emotion/react @emotion/styled만약 설치해보고 웹을 실행했을 때, 에러가 뜬다면 에러를 천천히 읽어보고 요구하는 라이브러리를 다운받습니다..
yarn add @emotion/babel-plugin만약 쓰고 싶은 라이브러리가 tailwind css라거나 ant-ui, matarial-ui 등등이더라도 공식문서를 확인해서 찾아서 라이브러리를 설치할 수 있습니다.
02. 프로젝트 목적에 맞는 라이브러리 설치
- 채팅앱을 만들 socket.io를 추가합니다.
yarn add socket.io-clientsocket.io란?
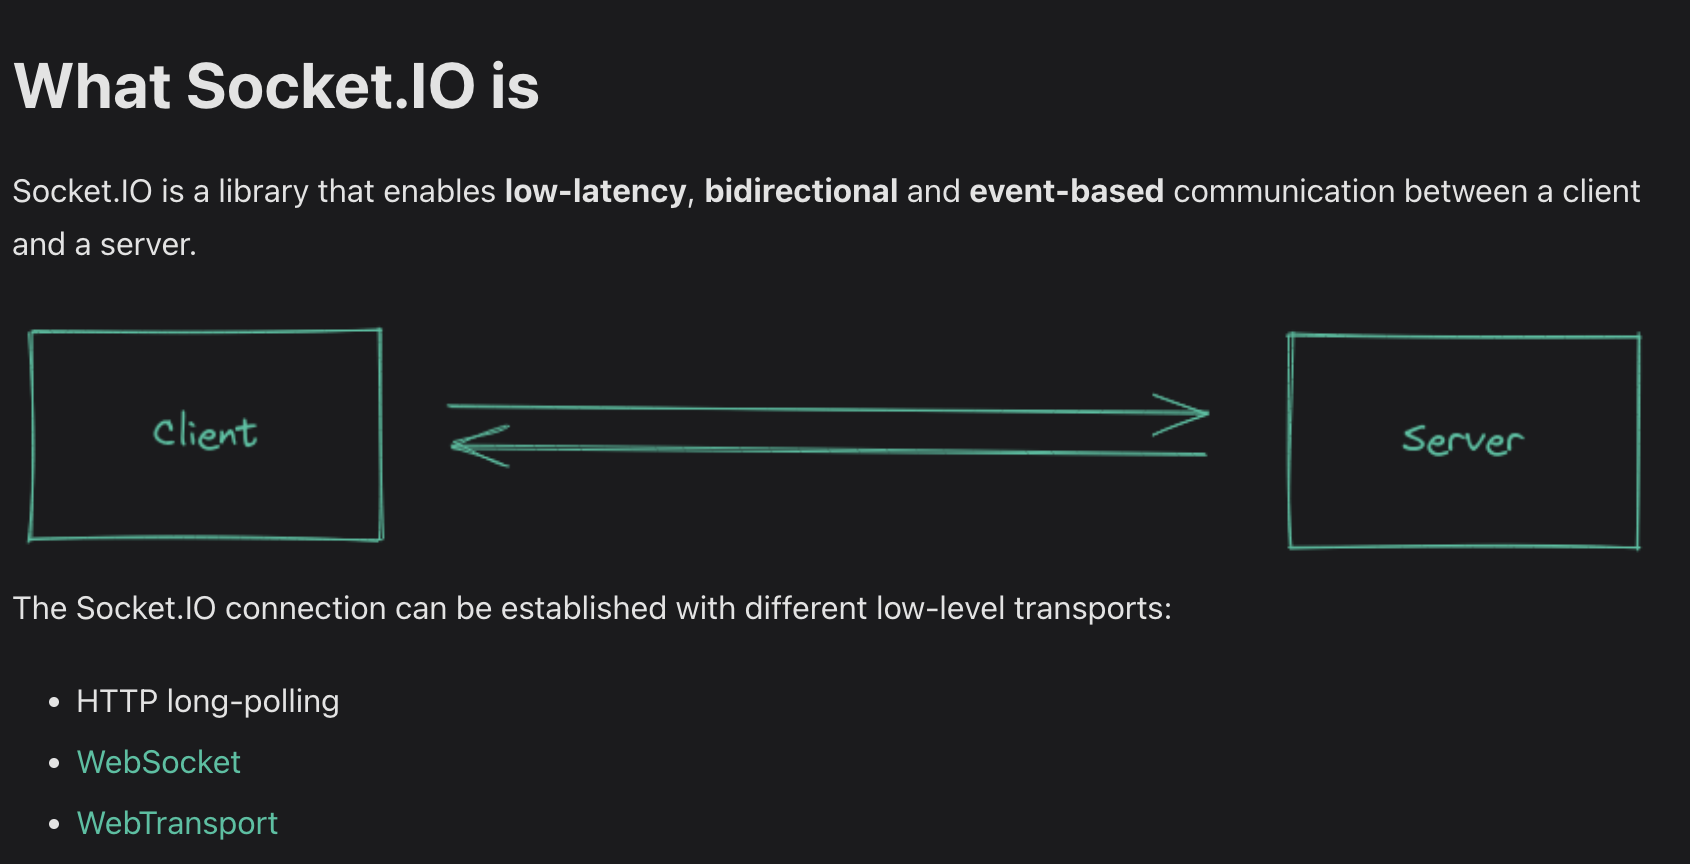
- 쉽게 생각해 웹소켓을 간편하게 사용할 수 있게 도와주는 라이브러리라고 생각하면됩니다.
- 웹소켓이란? 서버와 클라이언트간의 양방향 통신 프로토콜(규칙)
03. figma로 대강 ui 구상해보기
대략적으로 개발 환경 설정을 완료했다면 어떤 ui로 기능을 만들 건지 구상해봅니다.
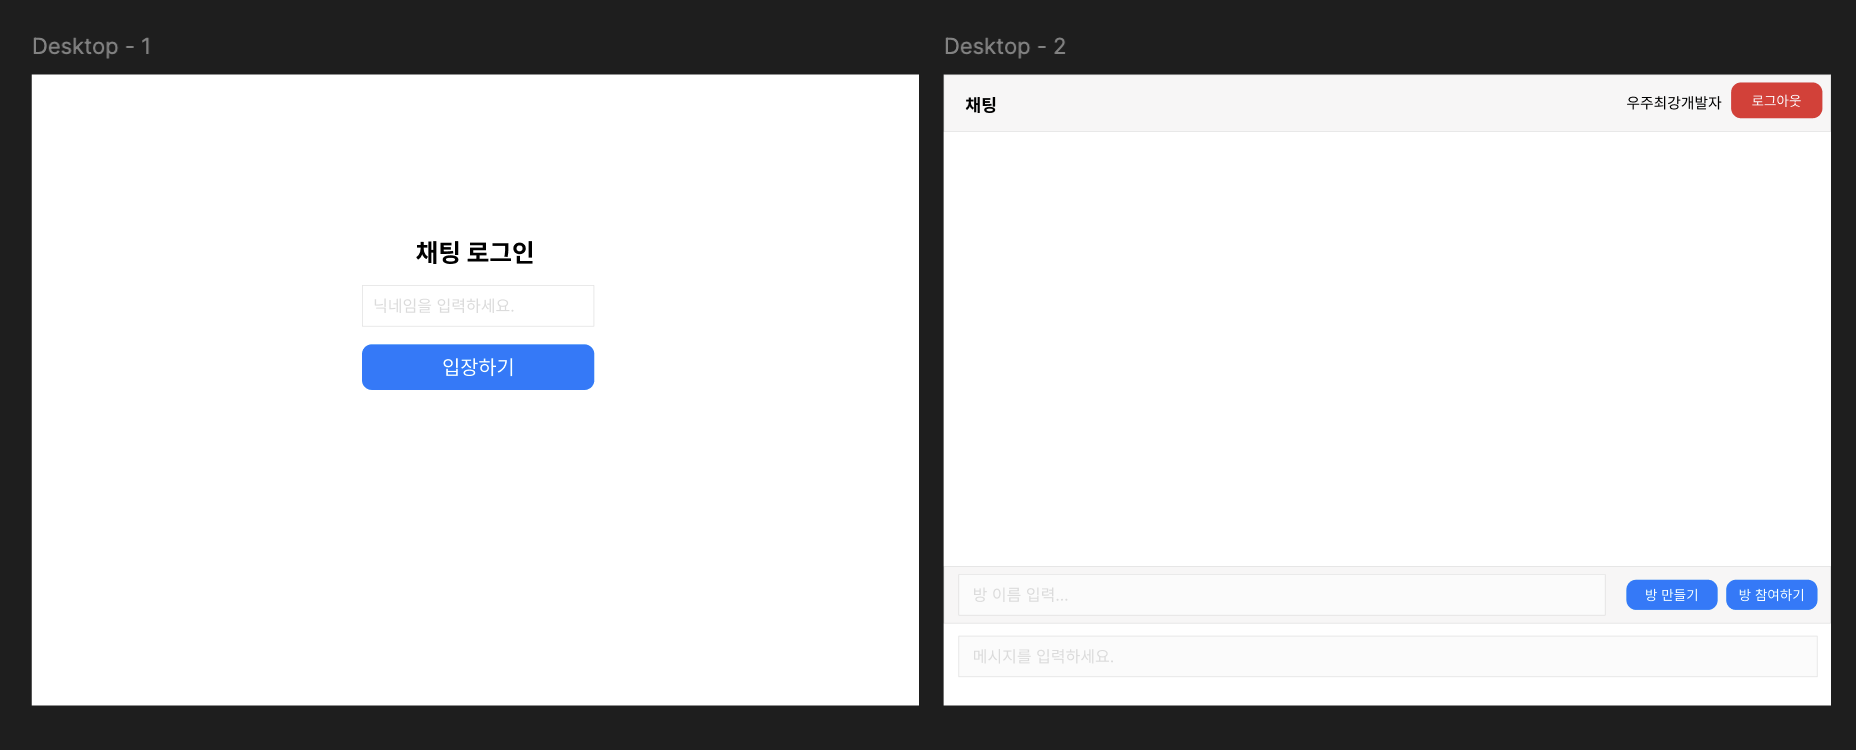
기능 설명
- username를 입력하면 채팅방을 생성할 수 있는 화면이 나옵니다.
- 방 이름을 입력하고 방 만들기를 클릭하면 채팅을 할 수 있는 채팅방이 생성/입장 됩니다.
- 방 이름을 입력하고 방 참여하기를 클릭하면 해당 이름을 가진 이미 존재하는 채팅방에 입장됩니다.
04. 로그인/채팅 컴포넌트 App.tsx에 연결하기
username이 없으면 로그인 컴포넌트가 보이게, username이 있으면 채팅 컴포넌트가 보이게 컴포넌트만 각각 구분할 수 있는 텍스트만 넣은 컴포넌트들을 만들어 App.tsx에 연결합니다.
// Login.tsx
interface LoginProps {
  onLogin: (username: string) => void; // 로그인 처리 함수
}

export default function Login ( { onLogin } ) {
    return (<><p>로그인</p></>);
}

// Chat.tsx
interface ChatProps {
  username: string;
  onLogout: () => void;
}

export default function Chat ({ username, onLogout }: ChatProps ) {

    return ( <> <p>채팅</p> </> );
}
컴포넌트 내부에는 위와 같은 구분하기 위한 간단한 텍스트만 입력하고 App.tsx에서 username의 상태를 useState로 관리하고 로그인 로그아웃을 실행하는 함수를 작성합니다.
//App.tsx

import React, { useState } from "react";
import { Chat } from "./components/Chat";
import { Login } from "./components/Login";

function App() {
  const [username, setUsername] = useState("");

  const handleLogin = (name: string) => {
    setUsername(name);
  };

  const handleLogout = () => {
    setUsername("");
  };

  return <div className="app">{!username ? <Login onLogin={handleLogin} /> : <Chat username={username} onLogout={handleLogout} />}</div>;
}

export default App;
05. 로그인 컴포넌트 만들기
import React, { useState } from "react";
import styled from "@emotion/styled";

interface LoginProps {
  onLogin: (username: string) => void; // 로그인 처리 함수
}

export function Login({ onLogin }: LoginProps) {
  // 사용자 이름 입력값 상태 관리
  const [username, setUsername] = useState("");

  // 폼 제출 처리
  const handleSubmit = (e: React.FormEvent) => {
    e.preventDefault();
    if (username.trim()) {
      onLogin(username); // 유효한 이름이 입력된 경우 로그인 처리
    }
  };

  return (
    <Container>
      <Title>채팅 로그인</Title>
      <Form onSubmit={handleSubmit}>
        <Input type="text" value={username} onChange={e => setUsername(e.target.value)} placeholder="닉네임을 입력하세요" />
        <Button type="submit">입장하기</Button>
      </Form>
    </Container>
  );
}

const Container = styled.div`
  display: flex;
  flex-direction: column;
  align-items: center;
  justify-content: center;
  padding: 20px;
`;

const Title = styled.h2`
  margin-bottom: 20px;
  font-size: 1.5rem;
  color: #333;
`;

const Form = styled.form`
  display: flex;
  flex-direction: column;
  gap: 10px;
  width: 100%;
  max-width: 300px;
`;

const Input = styled.input`
  padding: 10px;
  border: 1px solid #ccc;
  border-radius: 4px;
  font-size: 1rem;
`;

const Button = styled.button`
  padding: 10px;
  background-color: #007bff;
  color: white;
  border: none;
  border-radius: 4px;
  cursor: pointer;
  font-size: 1rem;

  &:hover {
    background-color: #0056b3;
  }
`;
06. 채팅 컴포넌트 만들기
import React, { useState } from "react";
import styled from "@emotion/styled";

interface ChatProps {
  username: string;
  onLogout: () => void;
}


export function Chat({ username, onLogout }: ChatProps) {
  const [messages, setMessages] = useState([]);
  const [input, setInput] = useState("");
  const [room, setRoom] = useState("");
  const [currentRoom, setCurrentRoom] = useState("");


  const onKeyDown = e => {
    if (e.target.value.trim() === "") return;
    if (e.key === "Enter" && !e.nativeEvent.isComposing) {
      handleSubmit(e);
    }
  };

  return (
    <ChatContainer>
      <ChatHeader>
        <span>{currentRoom ? `${currentRoom} 채팅방` : "채팅"}</span>
        <HeaderRight>
          <Username>{username}</Username>
          <LogoutButton onClick={onLogout}>로그아웃</LogoutButton>
        </HeaderRight>
      </ChatHeader>

      <MessageList>
        {messages.map((msg, i) => (
          <MessageItem key={i} isOutgoing={username === msg.author}>
            <MessageWrapper>
              <MessageAuthor>{msg.author}</MessageAuthor>
              <MessageBubble>
                <MessageBody>{msg.body}</MessageBody>
              </MessageBubble>
            </MessageWrapper>
          </MessageItem>
        ))}
      </MessageList>

      <RoomControls>
        <RoomInput type="text" value={room} onChange={e => setRoom(e.target.value)} placeholder="방 이름 입력..." />
        <RoomButton onClick={handleCreateRoom}>방 만들기</RoomButton>
        <RoomButton onClick={handleJoinRoom}>방 참여하기</RoomButton>
      </RoomControls>

      <ChatComposer>
        <ComposerInput
          type="text"
          value={input}
          onChange={e => setInput(e.target.value)}
          onKeyDown={onKeyDown}
          placeholder="메시지를 입력하세요..."
          disabled={!currentRoom}
        />
      </ChatComposer>
    </ChatContainer>
  );
}

const ChatContainer = styled.div`
  display: flex;
  flex-direction: column;
  height: 100vh;
`;

const ChatHeader = styled.div`
  display: flex;
  justify-content: space-between;
  align-items: center;
  padding: 1rem;
  background-color: #f8f9fa;
  border-bottom: 1px solid #dee2e6;
`;

const HeaderRight = styled.div`
  display: flex;
  align-items: center;
  gap: 1rem;
`;

const Username = styled.span`
  font-weight: bold;
`;

const LogoutButton = styled.button`
  padding: 0.5rem 1rem;
  background-color: #dc3545;
  color: white;
  border: none;
  border-radius: 4px;
  cursor: pointer;

  &:hover {
    background-color: #c82333;
  }
`;

const MessageList = styled.div`
  flex: 1;
  overflow-y: auto;
  padding: 1rem;
`;

const MessageItem = styled.div<{ isOutgoing: boolean }>`
  display: flex;
  justify-content: ${props => (props.isOutgoing ? "flex-end" : "flex-start")};
  margin-bottom: 1rem;
`;

const MessageWrapper = styled.div`
  max-width: 70%;
`;

const MessageAuthor = styled.span`
  display: block;
  font-size: 0.875rem;
  color: #6c757d;
  margin-bottom: 0.25rem;
`;

const MessageBubble = styled.div`
  background-color: #f8f9fa;
  padding: 0.5rem 1rem;
  border-radius: 1rem;
  display: inline-block;
`;

const MessageBody = styled.span`
  word-break: break-word;
`;

const RoomControls = styled.div`
  display: flex;
  gap: 0.5rem;
  padding: 1rem;
  background-color: #f8f9fa;
  border-top: 1px solid #dee2e6;
`;

const RoomInput = styled.input`
  flex: 1;
  padding: 0.5rem;
  border: 1px solid #ced4da;
  border-radius: 4px;
`;

const RoomButton = styled.button`
  padding: 0.5rem 1rem;
  background-color: #007bff;
  color: white;
  border: none;
  border-radius: 4px;
  cursor: pointer;

  &:hover {
    background-color: #0056b3;
  }
`;

const ChatComposer = styled.div`
  padding: 1rem;
  background-color: #f8f9fa;
  border-top: 1px solid #dee2e6;
`;

const ComposerInput = styled.input`
  width: 100%;
  padding: 0.5rem;
  border: 1px solid #ced4da;
  border-radius: 4px;

  &:disabled {
    background-color: #e9ecef;
    cursor: not-allowed;
  }
`;
여기까지하면 Socket.io를 연결하기 전단계인 UI작업이 끝납니다.
Vite React chatApp 만들기 ToDos ✏️
Vite React TypeScript 설정하기App.tsx 파일 vite 서버로 실행하기프로젝트에 맞는 CSS 설정하기- socket.io를 이용한 채팅 만들기
0. 이어서하기 : Socket.io로 채팅 연결하기
다음 게시물에서 socket.io를 이용해 채팅을 연결해보겠습니다.
(추후 포스팅 예정)
728x90
'Web Frontend > React' 카테고리의 다른 글
| Vite+React개발환경 설정하기 (feat. socket.io를 이용한 chat App) (0) | 2025.01.08 |
|---|---|
| JSX 유의사항 (0) | 2024.08.09 |
| useReducer로 useState 지옥 벗어나기 (0) | 2024.07.26 |
| Styled-components 태그에 속성 추가하는 법 (0) | 2024.07.10 |
| 🎯 Trouble Shooting 컴포넌트 리턴 후 발생하는 렌더링 에러 (0) | 2024.07.01 |
